Happy to offer my new rigging tutorial, decided to re-rig an old character but with all the new things ive learnt but though it might be good to also record and explain the process.
In this series ill go over from start to finish the whole process which includes IK and FK stretchy limbs, skinning and more advanced ribbon spines and cartoony bendy limbs but all in small chunks so even new riggers should be able to follow along.
Also including character mesh/source files to work along with.
Monday 7 January 2013
Saturday 24 November 2012
HR - WIP - 045
Via Flickr:
Early mesh test.
When creating this script i was also making a skeleton mesh. I was going to create a few more like a horse and bat but i decided not to so more time could be spent scripting.
However that didn't stop a few ideas floating around.
The main idea was that if its possible to blend between different limbs with Homology, then why couldn't this be adapted to the mesh aswell?
This early screenshot shows the human mesh being hooked to a human arm pre-rig, then blending to a bats wing. Obviously this will need more work (joints don't rotate) but you can see how quickly its get a new bone mesh with little effort.
With more time this could hopefully mean as you rig you also get a custom bone mesh. This might seem cool but quite useless as the bones are inside a character so never rendered. However these low-poly bones are designed for muscle skinning or any n-mesh skinning. Meaning that the end result could be used to drive maya c-mucles skinning.
This also ventures into the idea that if this is possible, then this could be used with a base mesh of a character, that way a low poly base mesh can be quickly created to aid in sculpting or quick reference for animation.
This could also reverse the was a character mesh is made. In traditional sculpting you would create a inner wire-frame with metal wires and start to build over them with clay, so your essentially making a simple skeleton and bulking the muscles ans skin on top. This workes well as your building a character on its bone structure, however in digital character creation we usually make a mesh and add the bones for rigging after... why? does it have to be done this way?
When you make a character you always pay attention to how it will animate/where the joints are but before there actually there. So wouldn't it be easier to get the skeleton in there so the sculptor knows exactly where things need to be instead of using 2D reference for the joints positions??
More research will be put into this but essentially, why cant we create a pre-rig of a character and mesh, so then this base mesh can be used for the sculpting of the character which is then already matched to its joints so that all its bones, muscles and rig can be procedurally built around the bone structure
Thursday 6 September 2012
Wednesday 5 September 2012
HR - WIP - 045
Via Flickr:
Woooo, everything is almost finished, just uploading all the WIP images ive not have chance to upload yet.
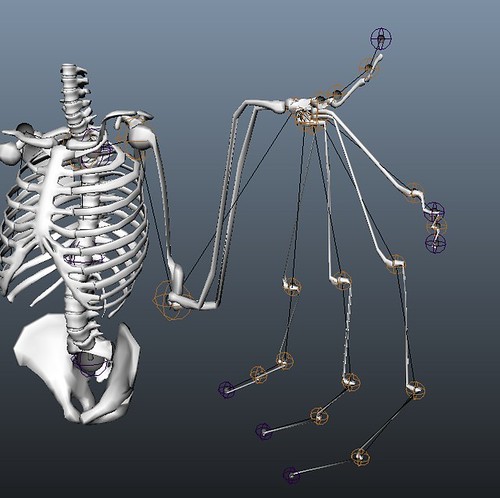
This is the "LongLimbIK". This is basically a more complex IK system for Limbs that don't end at the wrist.
Animals like dogs and horses don't have the ankle on the floor, its raised up to make a second bend in the leg, so using a normal IK would make the animation hard as the control wouldn't rest on the ground.
This uses a IK spring solver, which maya doesn't enable by default. The spring handles multiple bends better but this system doesn't stop there.
The leg is duplicated and a normal IKRP is applied to the last bend, and parented to the spring IK, this means the animator can now move the IK which rotate both bends correctly but also there's a pitch and twist attribute.
The pitch attribute allows the animator to place the ik anywhere, then have the limb rotate from the hip but still keeping its foot in the same place.
This is a massive advantage as this allows for a lot of control.
HR - WIP - 044
Via Flickr:
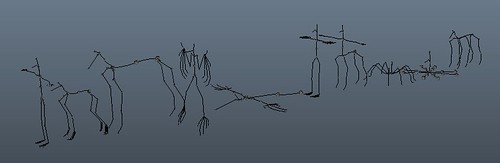
This is a line of all the full pre-sets. From left to right:
Human, Dog, Horse, Bat, Dolphin, Template, Centaur, Spider, Octopus and Hexapod.
When creating these you can specify custom names and joint counts for the spine and neck. Also this process is undo-able.
As so many limbs get made at the same time, a loading bar pops up to show how far its is through generating the character. It takes no longer that 10 seconds to generate one but the progress bas is there just to reassure the user maya hasn't crashed and its just working.
These pre-sets are fully integrated with the other tabs, so the user can still edit them or even add more limbs if they want.
HR - WIP - 043

Via Flickr:
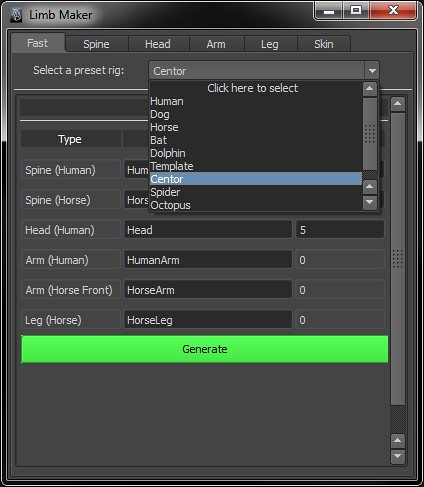
Now with Preset spider
Although this script doesn't quite cover insects (as they have extra joints for the legs) They will be supported later on so just to show how quick it can make different rigs ive added in a few pre-sets like spiders centaurs and octopuses.
Also, the user can use the fast tab to create the main pre-sets of human, dog, horse, bat and dolphin but the cool thing is that if we add some sliders that connect to all the limbs, its possible to blend from a full human rig to full horse rig ect...
HR - WIP - 042
Via Flickr:
Getting close to the deadline so im adding as many areas as possible as asked for in the user feedback.
This is the new first tab which is the fast rig. As everything is procedural this tab just generates a tab and rig to the most used characters.
This also means the new character is fully integrated with the other tabs, so you can still edit, delete or add new limbs.
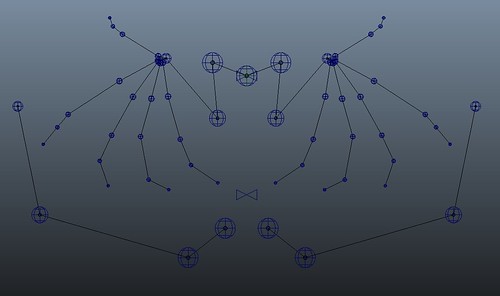
Leg_blending001
Leg_blending001, originally uploaded by James D Thompson.
Via Flickr:
Its also possible to key frame the sliders in the UI,
This just shows how the leg limbs blend seamlessly between the different species.
Thursday 23 August 2012
HR - WIP - 036
Via Flickr:
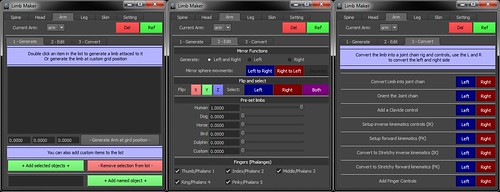
Quite happy with the final look of the tabs, think this will be the final look with a few possible changes.
This shows the generate, edit and convert tabs of the arm limb but the same exact layout is used for the legs (as they load from the same procedure).
The Spine and Head have the same generate tab but the edit and convert are slightly different but basically the same so its quick for the user to pick up.
Ive also added a refresh button which when clicked refreshes the entire GUI without deleting and re-opening it. This is if users press Undo, so for example if the user converts there limb to joints the convert button gets locked and turns green to show its been used and can't be used again. However if the user presses Undo, the limb is no longer converted to joints, so by clicking the refresh the GUI examine what's in the scene and reset the buttons to match, so the user can press undo if they have done something wrong and the buttons will refresh aswell.
I have made a script job that does the same thing. A script job is a script executed every time a trigger is activated, so for example i could have it so the GUI buttons refresh every time the user presses Undo which has a real time affect so the user has no need to click a button. However this has the effect of reducing the Undo list to 1, so its limits how many things can be undone so for that reason im sticking with a button for the moment.
Ive added a skinning tab which i might add some more skinning functions to and an edit tab which will contain some global setting and options.
Wednesday 22 August 2012
HR - WIP - 035
Via Flickr:
More fine tuning,
Now the head and spine both run on the same procedures except when there run with a variable set to "Head" instead of "Spine" it adds the head parts on top.
This is because basically the neck is a small spine section, so why bother making procedures to make and convert, add ik and fk to a neck when the spine procedures already exist.
This also have the huge advantage as the user can choose the amount of joints in the neck, which will help for unusual creatures that have long necks such as giraffes.
Tuesday 21 August 2012
HR - WIP - 034
Via Flickr:
Yo dog, we heard you were rigging a dog...
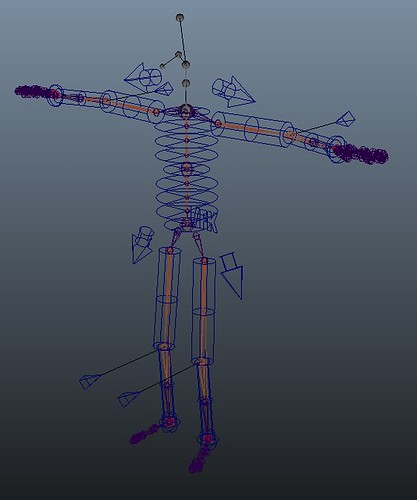
Huge update since last as iv gone over the whole script making it as efficient as possible.
No every limb is made from the same procedure (including the head), this is done by making a procedure that makes a sphere control and parents it to the previous sphere control so ultimately its quite like the joint tool.
I've also made the tabs procedural so all the "Generate" tabs are from the same procedure, all the "Edit" tabs are from the same ect... Also the Main tabs "Spine" "Arm" "Leg" "head" all come from the same procedure.
So in the end 16 different tabs all come from 2 procedures but there totally custom to the limb there making.
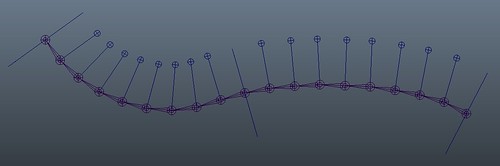
This picture shows how a quadruped might look like at the end. This was 100% made through the GUI of the script so it can give you an idea of what can be made, and this only took about 2 minuets to generate :D.
Other update are the clavicle controls, automatic pole-vector and improved naming conventions.
What I might add at the end is a quick build tab where the user can specify the more common used animals such as Human horse bat and dog, which will then build the entire animal in pre-rig move (so the user can move it to fit the mesh) then convert the entire thing so its only 2 steps for the more common animals.
You may notice that the clavicle controls are pointing down, this is because there parented under a group that's rotated to match the joint they control, this means the clavicle control's rotation and the joints rotation match, which means the rotate perfectly with no nasty offset.
The back legs on this also have clavicle controls but its optional so you don't have to have them (as there isn't a clavicle in the hip) but ive left the option in as this can be used for some strange creatures that might have a clavicle (To get things like hexapods working) also it allows a little more freedom for the animator to get better poses.
Thursday 16 August 2012
HR - WIP - 033
Via Flickr:
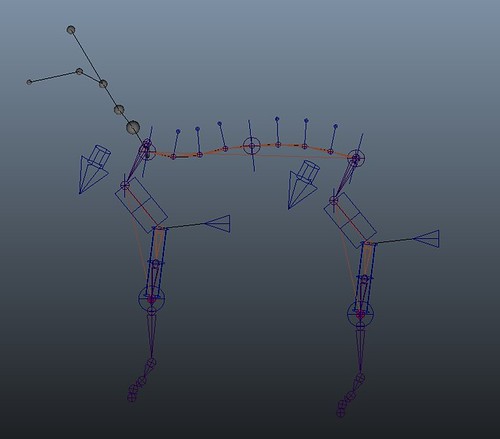
First look at a full working procedural rig :D.
This uses the default human pre-sets with stretchy IK and FK on all limbs.
Later on I think ill add a quick generate button where the user can bulk generate, e.g. human will run all the limbs to make a pre-set human and horse will make a horse for users that want a quick rig and don't need to edit the rig much.
Tuesday 14 August 2012
HR - WIP - 032
Via Flickr:
This picture is just the spine with FK controls.
Here there are 3 main controls and individual controls for each joint.
Each control is parented in a hierarchy and then to the Main control below it.
The animator wont usually need this many so the individual controls can be hidden as for most cases the large start mid and end controls will do but for any FK rig its important to be able to have the option to tweak all the joints.
HR - WIP - 031

Via Flickr:
More spines!
From left to right is how the spine is made
Left: The user enters a name and joint count and a pre-rig is made which the user can move around to fit there character. Although its just 3 controls to move the curve is very smooth (depending on the joint count the user entered)
Middle: The pre-rig is converted to two joint chains, one that is a joint chain from start to end, the other is separate joints point constrained to the last chain.
This way the 1st chain or joint driver, moves the 2nd set of joints, this allows the rotation to be hooked to something else later for better spine twisting.
The main problem with IKSplines is that there is no Twist (well there is a twist attribute but its functionality is very limited). So the idea for this to have the spines "Twist" driven by the rotation of the 3 controls.
This has been quite fun to get working because the aim was to get just a pre-set 5 joint spine working but not its possible to get 10000+ joint spine if you think you're Maya could handle it :).
HR - WIP - 030
Via Flickr:
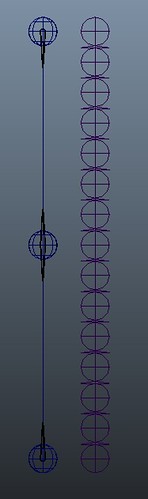
This is what the spine set-up sphere controls look like. (the joint have been moved for the pic but they lay on-top normally).
This is the same as the other limbs where you are given a "Pseudo" rig to work with that is converted to a rig after your happy.
This has 3 spheres with little tangent spheres in the middle to show the direction of the curve. Unlike other limbs, the user is asked how many joint the want in there spine, then the "Pseudo" curve has the same amount of cv's.
Moving the spheres moves the curve via a smooth skin so the curve eases in and out of the controls for better smooth spine placement.
After the user is happy the curve is converted to joints, to do this it needs to know how many CV's there are on the curve so:
curve.degree + curve.spans = cv count
Now we can run a loop that xforms the position of each cv and makes a joint chain on them.
Now we have a clean joint chain to make a spine from :).
HR - WIP - 029

Via Flickr:
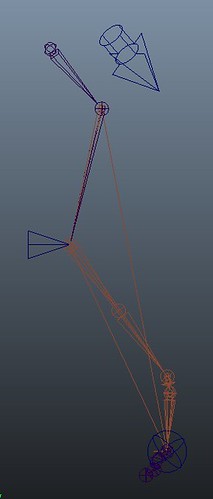
For most limbs an normal IK will do but for limbs like dog's and horses they have to work a little different.
This is because in human arms/legs the IK would end at the writs/ankle but as the done structure is different in some other animals the IK needs to finish at the Metacarpals.
This is because those animals look like they have a "backwards knee" but intact that's actually there wrist joint and its the Metacarpals that are on the ground.
To make this work a different IK set-up is needed, so for this im using the spring IK. This ik is quite similar but it handles more that one bend better (e.g. the knee and wrist).
Thursday 9 August 2012
HR - WIP - 028
Via Flickr:
Wooooo,
Got another bit working better.
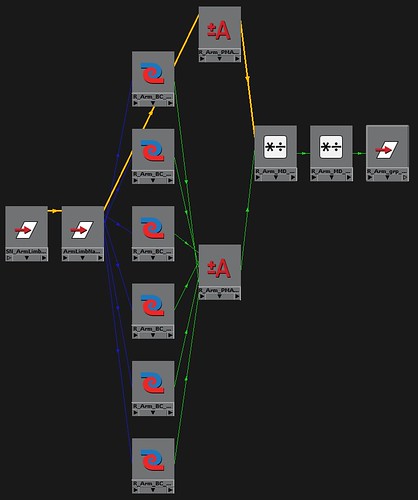
This node graph is responsible for blending the limb between the pre-set limbs but the new addition to this means the blend in the same area whereas before it just added the two together.
Adding them together did blend but it resulted in the final limb being twice as large.
Form left to right:
The group node to the far left is connected to the GUI, so as the user slides the slider it changes the attributes of this group (0 to 1)
The output of the sliders is input into the blend colour nodes, so if the human slider is set to 1, the human blend colour node blender is 1, which takes the true value (which is the human pre-set).
Then the sum of all these blend colour nodes is fed into an average node which adds them all up.
Then the top average node connected to the start group adds up all the blend values.
This means the 1st multiply divide node takes the output from the pre-sets and divides it but the total sliders, meaning that if 2 sliders are set the the max, the limb is twice as large as before, but now it gets divided by the sum of the sliders, so its reduced back to its normal size.
This means that when you slide up several sliders at the same time the output limb is a mix of them but not the sum, so it all blends in the same area.
The last Multiply divide node multiples the final result by 2, this is because the average node at the top has an added value of 1, this added 1 is to avoid multiplying by zero if all the sliders are set to 0. By adding the 1 and later multiplying by 2, the same result is made but without getting a zero if all sliders are off which causes errors for dividing by 0.
HR - WIP - 027
Via Flickr:
Just going back through the script and fine tuning and fixing a few areas that have been left.
Now its possible to choose if you want the left, right or both but also mirror your movement from left to right or right to left.
This makes it easy to create symmetrical character or the user can even mirror the movement to get a good approximation, then disconnect the mirror to make them slightly different.
HR - WIP - 026
Via Flickr:
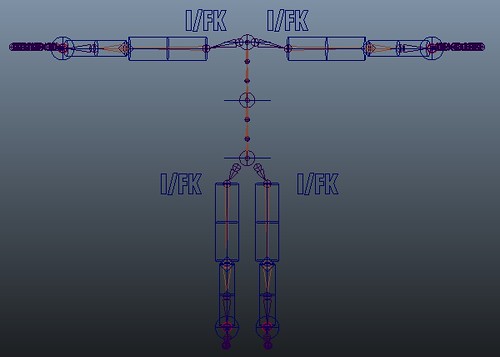
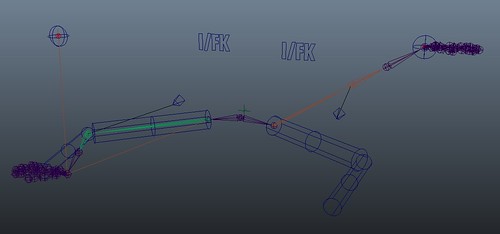
Now its able to add IK, FK and convert those to stretchy IK and FK.
This was quite hard to set up as im trying to make it as flexible/fool proof as possible, this way the user it able to create IK or FK in any order or even add them after the character has been skinned or even animated.
Tuesday 31 July 2012
HR - WIP - 025
Via Flickr:
:D
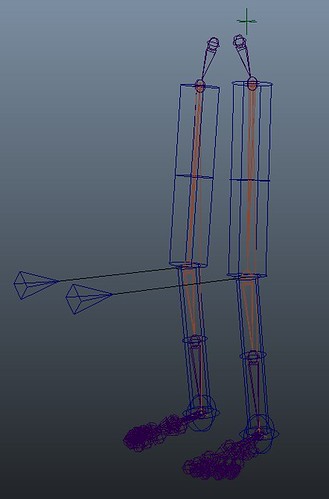
This is where the hard work is starting to pay off.
With absolutely no change apart from using "Leg" as the procedures argument instead of "Arm" the whole process of adding IK, FK, Pole vectors, Stretchy limbs and control curves is completely compatible with all "Leg" limbs.
And By "Arm" and "Leg" this is referring to all upper and lower body limbs be that birds wings, flippers horse legs.
For parts like the spine and head the bones are different so they will need there own custom procedure's but those custom procedures will be very small as that will just be using the same procedures that the arm and legs do to convert to joints, set-up the GUI and do all the IK/FK stretch and controls.
making this all procedural and flexible to work with any limb has really saved a huge amount of time as basically one process can be applied to all limbs.
Subscribe to:
Posts (Atom)